Playing Minecraft with friends over Nebula: a simple guide
Ever wanted to play Minecraft with friends who arenʼt on your local network, but didnʼt want the hassle of setting up a dedicated server or paying for Minecraft Realms? Today, Iʼll show you how Managed Nebula simplifies creating your own private gaming network. Think of it as building a virtual LAN party that spans the entire internet—no technical wizardry required.
Why Nebula changes the game
The traditional ways of playing Minecraft remotely with friends can be a pain. Port forwarding feels like youʼre punching holes in your home networkʼs security. Dedicated servers demand technical knowledge you might not have (and who wants to maintain yet another server?). Minecraft Realms costs money every month and puts limits on what you can do. And donʼt even get me started on the complexity of traditional VPN solutions.
This is where Nebula shines. It creates a peer-to-peer mesh network that connects you and your friends directly—imagine drawing invisible tunnels between your computers through the internet. Your traffic gets encrypted automatically, everything works through NAT and firewalls without any router configuration, and the best part? It just works. No port forwarding, no exposed IP addresses, just secure gaming with minimal latency.
What youʼll need to get started
Before we dive in, letʼs make sure you have everything ready. Youʼll need:
- a Defined Networking account (the free tier is perfect for small gaming groups)
- Minecraft Java Edition installed on each computer that wants to join
- DNClient Desktop (our desktop client) which handles all the networking magic behind the scenes
Donʼt worry if this sounds like a lot—the whole setup takes about 15 minutes, and Iʼll walk you through every step.
Step 1: Creating your gaming network
If you havenʼt yet created a Defined Networking account, sign up for a free account, and once youʼre in, then click Create network. Itʼs fine to use the default settings. This will set up the virtual network for your gaming group.

Now comes the important part: adding your first lighthouse. Think of a lighthouse as a friendly coordinator that helps all your devices find each other across the internet. Click Lighthouses and click the Add lighthouse button. Follow our lighthouse setup instructions to get it deployed—itʼs mostly copy-and-paste commands, and the whole process takes about 5 minutes. The important thing is that this is a server with a public IP address on the internet, a computer on your home network won’t do. Luckily a lighthouse sips CPU, so you can choose any cloud provider youʼre comfortable with. (DigitalOceanʼs $4/month droplet is more than enough, or if youʼre feeling adventurous, check out our guide for setting one up on Fly.io which can be even more cost-effective).
The quick and dirty steps:
- Download the
dnclientbinary from defined.net/downloads for your lighthouseʼs platform. We also provide a Docker image for easy deployment, available at defined.net/downloads. - Follow the installation guide to have it run at system startup.
- Note down the public IPv4 address of your lighthouse, provided by your cloud provider. You may have to request the provider to allocate a static IPv4 address for your lighthouse. If you try to use an IPv6 address, your hosts will only be able to connect to each other over IPv6.
- Create the lighthouse in the admin panel, naming it ‟Lighthouse”, and adding the public IPv4 address you noted down in step 3.
- Follow the instructions on screen after creating the lighthouse to enroll it in your Nebula network.
Pro tip: Your lighthouse automatically works as a relay too. This means even if direct connections between players arenʼt possible (thanks to stubborn firewalls or carrier-grade NAT), your games will still work smoothly.
Step 2: Bringing your gaming computers into the network
Now for the exciting part—adding all the computers that will be playing Minecraft together. This is where your network starts to take shape.
In your network dashboard, click Add Host and choose Host as the type. Give each computer a friendly name that makes sense to you—‟My Gaming Rig”, ‟Sarahʼs Laptop”, or whatever helps you keep track of whoʼs who.
While setting up each host, make sure to add the tag minecraft:players. Youʼll see why this is important later on when we configure the Minecraft firewall rules.
The system will suggest an IP address for each host (something like 100.100.0.23), which will work perfectly fine for our purposes. Once youʼve configured the host, save the enrollment code—youʼll need this in just a moment.
Now, hop over to each gaming computer. Install DNClient Desktop if you havenʼt already, and use the enrollment code to connect the computer to your network. Within seconds, you should see the host appear as ‟online” in your dashboard.
Repeat this process for each friend who wants to join your Minecraft adventures. The beautiful thing is that once theyʼre set up, they’ll stay connected to your network automatically whenever their computer is on.
Step 3: Setting up the Minecraft connection rules
By default, Nebula keeps things locked down for security—itʼs like having a bouncer at an exclusive club. We need to tell it that Minecraft traffic is on the guest list.
Navigate to the Roles section in your admin panel. Weʼre going to create a special role for the computer that will host your Minecraft world. Add a role called ‟Minecraft Server” that allows traffic on port 25565 from hosts tagged with minecraft:players. This says ‟anyone tagged as a Minecraft player can connect to this hostʼs Minecraft game.”
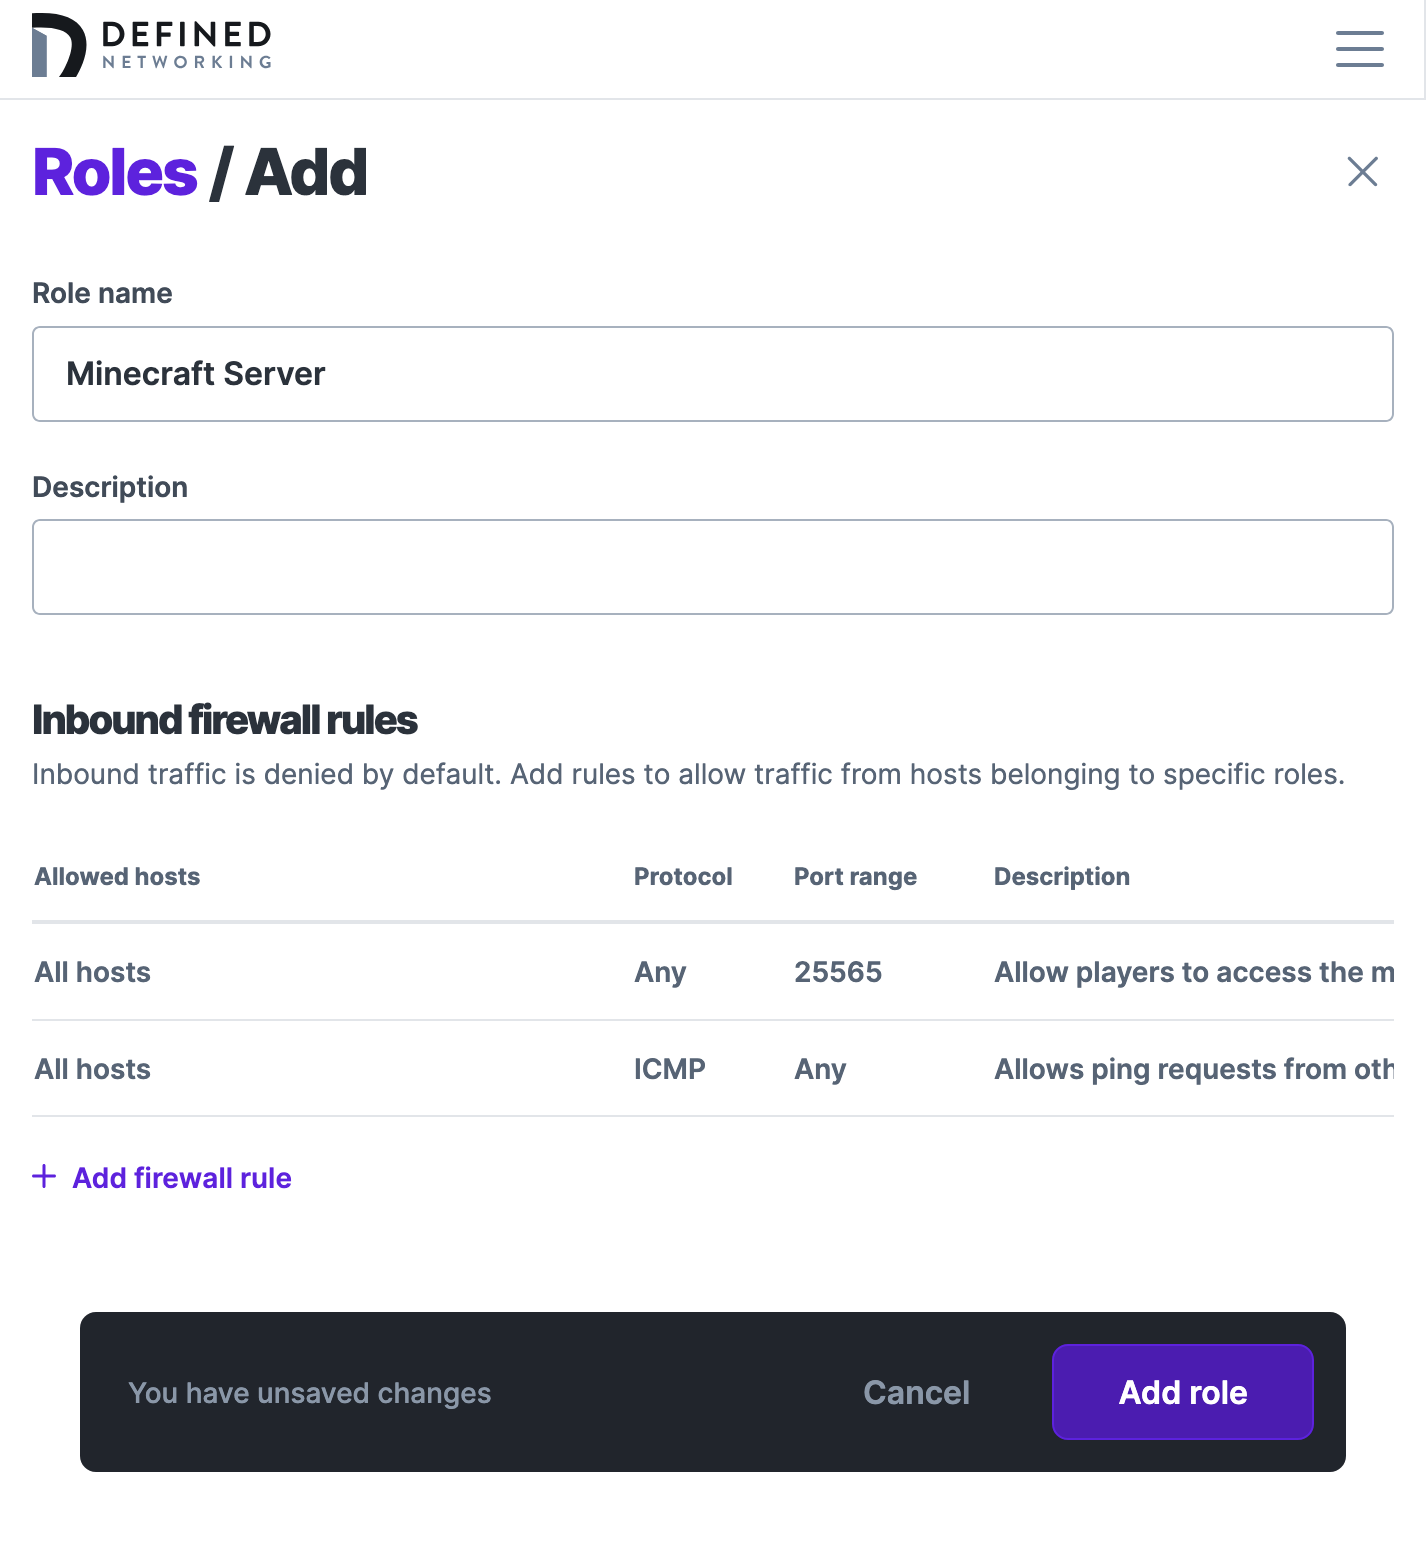
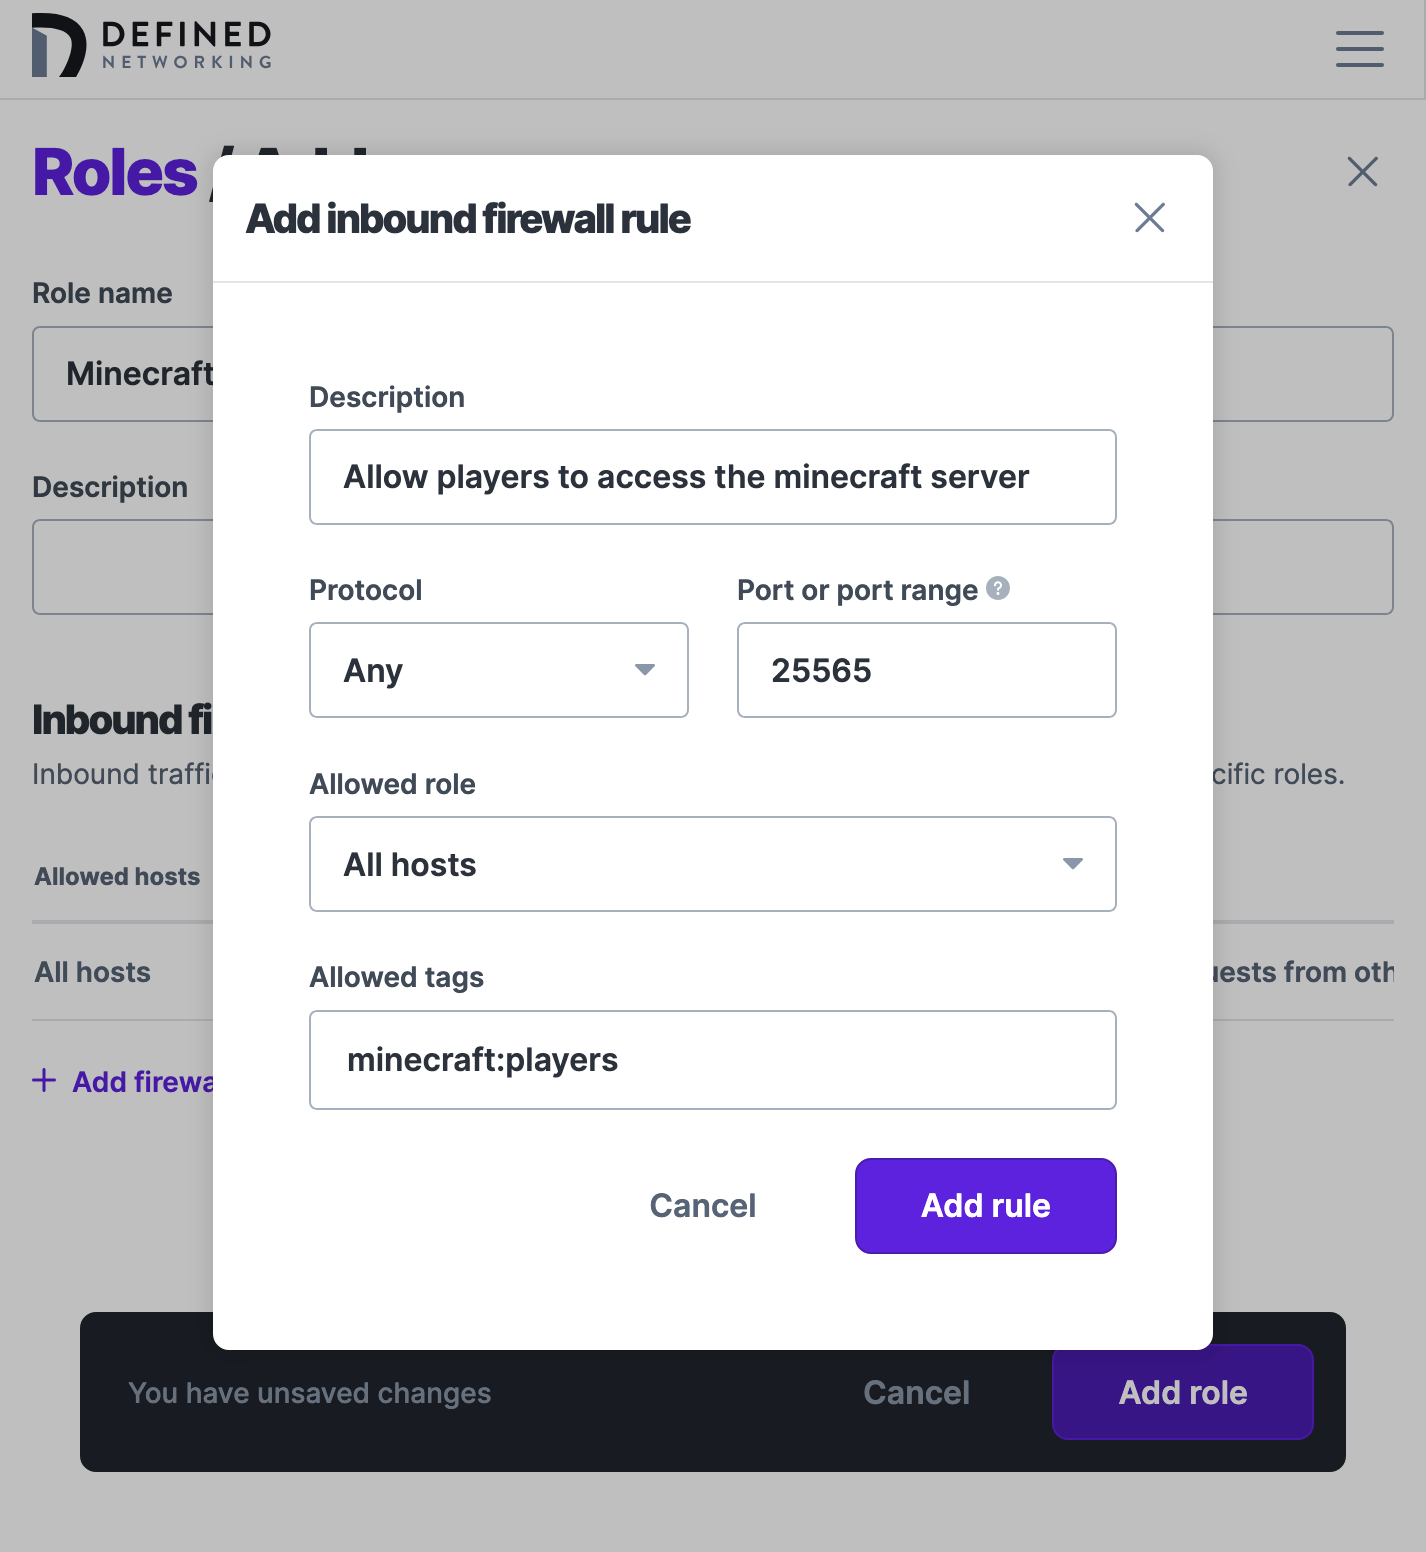
After creating the role, assign it to the computer that will be running the Minecraft world (this is whoever will click ‟Open to LANˮ in the game). Then, head to the Hosts section and tag all your gaming computers with minecraft:players. This tagging system means you can easily add new friends later without reconfiguring firewall rules.
Step 4: Launching your Minecraft world
Hereʼs where traditional server guides get complicated with configuration files and command-line options. But weʼre going to use Minecraftʼs built-in ‟Open to LAN” feature—itʼs just a few clicks!
On the computer that will host the game, launch Minecraft Java Edition and either create a new world or load your existing one. Once youʼre in the game, press Escape to bring up the menu and click ‟Open to LAN”.
Choose your game settings—survival or creative mode, whether to allow cheats—whatever makes your group happy. When you click Start LAN World, Minecraft will ask for a port number, be sure to set it to 25565. Make a note of this number; your friends will need it to connect.
Step 5: Gathering your friends in the game
This is the moment where it all comes together. Your friends can now connect to your Minecraft world using your Nebula IP address—it works exactly like joining any other Minecraft server, except this one is completely private to your group.
On each friendʼs computer, theyʼll open Minecraft, click Multiplayer, then Add Server. For the server address, theyʼll enter your Nebula IP followed by the port number. If your Nebula IP is 100.100.0.23, theyʼd enter 100.100.0.23:25565. They can name the server whatever they want—‟Friendʼs Awesome World” or ‟Tuesday Night Mining Club”—then click Done and Join Server.
And just like that, youʼre playing Minecraft together! No exposed IP addresses, no security risks, just pure multiplayer fun.
Your gateway to better gaming
Setting up Minecraft over Nebula transforms online multiplayer from a technical challenge into something as simple as local play, but with the security and flexibility of a professional network overlay. No port forwarding nightmares, no exposed servers sitting on the internet, just pure gaming enjoyment with the people you choose.
This same Nebula network isnʼt just for Minecraft. Once youʼve got it running, adding rules for other games takes minutes. Terraria, Valheim, any game with LAN support—they all work the same way. You can even use it for file sharing, remote desktop access, or running your own private services. Consider this your gateway to taking control of your online gaming experience.
Ready to build your own private gaming network? Sign up for Defined Networking and youʼll be mining with friends in under 15 minutes. No networking degree required, just a love for gaming and a desire to play together securely.
Resources for your journey
When youʼre ready to explore more, check out the Defined Networking Documentation for advanced configurations, dive into the Nebula Documentation if you want to understand the technology powering your network, browse the Minecraft Wikiʼs Multiplayer section for game-specific tips, or reach out to our support team if you get stuck—weʼre gamers too, and we love helping people play together!
Happy mining, and welcome to the world of secure, private networking! ⛏️💎
Nebula, but easier
Take the hassle out of managing your private network with Defined Networking, built by the creators of Nebula.